Projecting from a Laptop
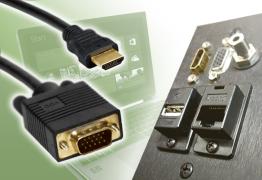
All classrooms equipped with the Digital Classroom Systems have HDMI inputs that may also be used to project from laptops. Some older systems may also have a VGA cable that may be used to connect a laptop to the projector. The VGA port on a laptop consists of three rows of five holes.
To see if your classroom has a data projector, search for the room and click on the "Technology" tab. To see if your room also has a VGA input, click on "Classroom Features" and check "Additional Items."
Newer laptops may not have a VGA or HDMI port. If your laptop does not have a VGA or HDMI port, you will need to purchase an adapter that allows you to connect one of these two cables to your laptop.
Getting Started
- Turn on the system and select the appropriate button for laptop.
- Connect the VGA or HDMI cable to your laptop's VGA or HDMI port. If you are using a HDMI or VGA adapter, plug the adapter into your laptop and connect the provided cable to the other end of the adapter. In DCS rooms where the VGA and HDMI cables are not attached to the system, you will need to connect the other end of this cable to the system jack.
- Turn on your laptop. After your desktop has loaded, your laptop image should project. If it does not, please follow the instructions below that pertain your laptop's operating system.
- While holding the Windows button located on the keyboard, press "P". Your display options will appear.
- While continuing to hold the Windows button, press "P" to highlight each option. Highlight "Duplicate" to project the image that appears on your laptop monitor.
- Highlight "Extend" to use the projector as a second monitor. You can then drag items off of your laptop monitor and on to the projected image.
- Release the Windows button when you have highlighted the desired option.
Setting Up the Laptop for Video Mirroring
Video mirroring projects the image that appears on your laptop monitor.
- On your Mac, choose Apple menu > System Preferences, click Displays, then click Display.
- Ensure both monitors are set to the same resolution.
- Click Arrangement, then select Mirror Displays.
Setting Up the Display as an Extended Desktop
- On your Mac, choose Apple menu > System Preferences, click Displays, then click Arrangement.
- Follow the onscreen instructions.
If your Mac Doesn’t Detect a Connected Display
- On your Mac, choose Apple menu > System Preferences, click Displays, then click Display.
- Click the Detect Displays button. (You may need to press the Option key to see the Detect Displays button.)
Note: If this does not work, you may need to reset the adapter connection to the laptop or restart the laptop.

